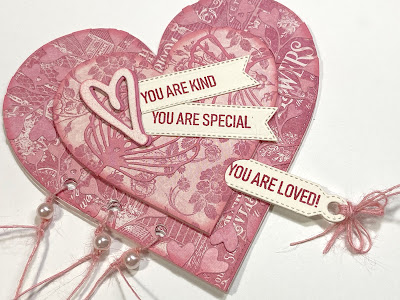
The new Planner Essentials line for 2020 has just been released and it's fabulous! You can view all of it here. Today I'm sharing a TUTORIAL for a cute little Valentine's card made with Planner dies. (Yep, you heard correctly.) I wanted to show how the Planner Essentials dies and stamps can be used for all types of crafting, not just planners.
I've used the Planner Essentials 25 Double Heart Insert Set, Planner Essentials 20 Half Heart Page Set, and two stamp sets: Pieces of Life 3 Quotes and Pieces of Life 4 Retro.
The top heart layer of the card has a clever channel with a slide-out feature for a hidden message.
I've used Graphic 45's Bloom papers for my envelope and card.
Below are all the steps to create it yourself...
Step 1: Die cut the Double Heart base from light pink cardstock. Die cut the smaller heart from coordinating pattern paper, then cut the righthand portion of the heart base from coordinating paper.
Step 2: Die cut the heart-leaf stem several times from pink cardstock. Adhere over the large pattern paper heart from Step 1, trimming excess around edges.
Step 3: Trace the smaller die-cut heart onto pink cardstock, without the notch, then cut out.
Step 4: Trace the pink cardstock heart from Step 3 onto medium weight chipboard and cut out. Die cut the stitched-edge tag and stamp a sentiment. Place under the notch, trace the outline onto the chipboard heart and cut away a channel.
Step 5: Adhere the patterned heart to the chipboard heart then to the pink heart. As you can see, I've die-cut another tag in ivory instead of pink. This makes it stand out better. I die-cut three more and layered them up so they were thick enough to slide in and out of the channel without falling out.
Step 6: Die-cut two different flowers from pink cardstock and adhere to patterned heart, trimming excess. Slide the sentiment tag into the channel.
Step 7: Die-cut two stitched banners from ivory cardstock. This die is from Planner Essentials 26, Pocket 3 -Tag & Toppers. Stamp desired sentiments and trim off the left edge of the banners.
Step 8: Adhere large patterned heart to cover of card.
Step 9: Die-cut the Double Heart shape from pattern paper and cut the pieces apart, also cutting inside the stitched line slightly. Adhere to card base (inside).
Step 10: Die cut several of the small heart shapes in desired colors and layer up, leaving the darkest one offset slightly like a shadow. Adhere elements to card front. Add twine to sentiment tag and through three holes on left edge. Add beads or charms to dress it up.
The sentiment tag is just thick enough to slide in and out easily without falling out. How fun for the recipient to pull this out to reveal an additional sentiment!
You can dress up the inside with more die-cuts. Here, I've die-cut LOVE from ivory cardstock and dabbed pink ink lightly over the top.
As you can see, this card could also be a planner insert. Just add a photo inside and some journaling!
I hope you enjoyed the project. Make sure to visit the ECD blog today to view all sorts of creations from the talented design team members using the new Planner Essentials release.


I just had to come over and say congratulations on joining the ECD Team, they must be so thrilled to have you on board! I love that you showed a different way to use the dies and those pearly charms look so beautiful! Anne x
ReplyDeletethanks Anne. You’re so kind. I’m looking forward to all the changes the new year will bring.
DeleteI agree they Elizabeth Craft Designs is so lucky to have you on their design team. Thank you for sharing this wonderful idea.
ReplyDeleteThanks Judy! I’m excited for this year!
DeleteThis comment has been removed by the author.
ReplyDeleteHow great! Congrats on joining EC! Really wonderful dies and products. Love this sweet project you've shared!
ReplyDeleteI get their newsletter/blog and I watch Els on Friday when I can and I've won their give away twice over the years! :)
They actually have random drawings so anybody can win...not just ppl in the inner circle. :) Good luck to you and look forward to seeing your inspiring creations!
Thanks Roxanne. I'm excited to be back with ECD. And congrats to you for winning twice!!
Delete