The attic is calling me. (whoa, that sounds creepy...) The Halloween decorations will soon be going up in my house. I have a LOT of stuff, mostly hand made, so I'll be sure to share with you once it's all put out and arranged. Meanwhile, I just had to make something new this year. Just for fun.


If you've followed me for very long, you may remember this piece I did back in 2011.

I like the small size and thought I'd mimic it with a Halloween theme this time.

Lots of great Ranger and Tim Holtz products, not to mention Wendy Vecchi's new translucent embossing paste.
Here's a quick look at how it came together...

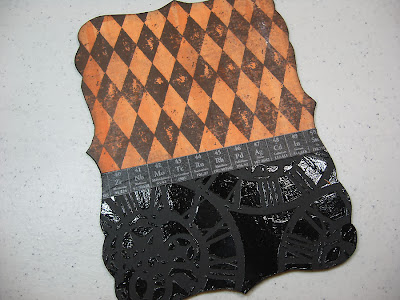
Black mat board pieces. I used a template saved from the first project.

Embossing paste using two of Tim's newest stencils: Clockwork and Bubble. The embossing paste will dry clear with a shine to it. A fun background effect.

On a sheet of Tim's new Laboratorie paper, I washed some Rusty Hinge Distress Stain over the black and white diamond print.

This was used to cover the top half of the piece as shown. Tissue tape separates the two sections. See how cool the embossing paste looks when dry?

From Grungeboard, I die cut the wrought iron fence and painted it with Brushed Pewter Distress Paint.

Then, to dirty it up, I quickly spread Black Soot Distress Paint with my finger over it.

Next I stamped this big skelly (Retro Halloween) with Jet Black Archival onto the back side of a Crowded Attic paper stash scrap.

I cut him out... then cut him up. Mwah-HA-ha-ha!

Also from the Laboratorie paper stash, I die cut this crescent moon and a few stars (not shown) and colored them with Wild Honey Distress Stain. I love the new Crescent Moon & Stars die!

I punched an oval from the Laboratorie 2 x 2 page and colored it with Peeled Paint Distress Stain, then popped it into a collage key.

Rather than use the clear epoxy bubble that comes with the collage keys, I glued a new Crossbones Idea-ology Adornment with strong metal glue. (E6000)

For the lower piece, I simply added die-cut letters and a leftover star. I like using Kraft Core card stock so I can sand-distress the edges for a cool effect.

Using the Holly Branch die, I cut the branch and leaves also from Kraft Core. The spider was cut from the Candlelight Fright die.

A few chit-chat seasonal word stickers.

Did you notice Skelly's wings and crown?

A ribbon and waxed twine attach the key.

I punched holes in the pieces with the Crop-a-dile and strung bead chain through to connect them. A simple magnetic hook on my front door (which is metal) serves nicely for this lightweight piece.
So, what do you think? Is this something you'd give a try? Are YOU a big fan of Halloween like me? I'd love to hear your thoughts.
Thanks for stopping by today. I hope your Thursday is fantastic!
You can find all these great products I used today is these online stores, or check your local craft store.
Spooky good. Looks like it came together quickly. Love how you combined all the idea-ology pieces and inked up the paper. Fun!
ReplyDeleteVery cool, Annette!
ReplyDeleteNice info..the great post.
ReplyDeleteThanks for sharing
Rating Therapist
Annette this is absolutely awesome! YES I LOVE Halloween too! I cannot wait to start making my décor items for this year. If you don't mind me asking you, what is the embossing paste and exactly what does it do? Thanks!
ReplyDeleteHugs,
Jo
xox
I love your decorations they are stunning and perfect for the ocassion
ReplyDeleteWell done for a brilliant Halloween design