I pulled them out and stared at them, thinking of what I could do with such a small tin. Then I remembered a mini book Tim Holtz created and shared this video on how to make it. It was the perfect size to put in my tin! Keep in mind, Tim has done TONS of videos and they are all categorized right on his blog. You can watch them right there or go over to YouTube. Up to you.
So here is the tin BEFORE...
It's about 3 1/4" x 3 1/2".
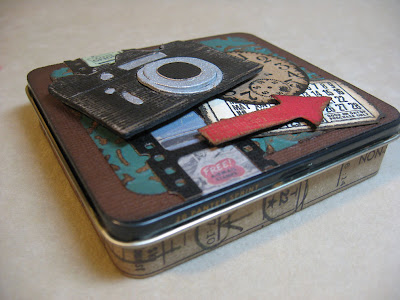
And AFTER...
I decided it would be a travel mini book inside. But the theme could easily be adapted to something else. I think it would make a great Father's Day gift.
All supplies used are listed below, and most everything you will find at eclectic Paperie, so just click on those linky photos at the bottom and they will take you right to the store.
The Destinations paper pack was my choice for this project. A 1/2" x 12" strip from one of the sheets is adhered around the sides of the tin. I had to patch in another small piece on the back for it to reach all the way around.
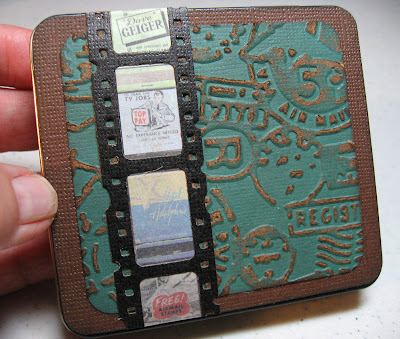
Just so you can see what's going on under the collage of items, this is what adhered to the lid first. I used Kraft-Core card stock, embossed the teal one with the new Airmail & Compass Texture Fade, sanded it and inked it with Walnut Stain. The filmstrip is also new (Mini Filmstrip and Tickets die) cut from black card stock, layered underneath with matchbook images from Destinations.
The camera is from the Vintage Alarm Clock and Camera set of Movers & Shapers dies. Love this little guy. I cut him twice. Once from grungeboard and the second from black card stock. I used Brushed Pewter Distress Stain to make the shiny pieces. Yep, some of those are pretty tiny. After they were dry, I glued the black piece over the grunge piece, then popped those tiny accents back into place. Since I popped up my camera on the cover of the tin, I had to create a card stock base under the camera for those small pieces to stick to when I put them back into place. Make sense?
Here's a before and after. I stamped a clock and ticket and die cut an arrow and layered them either with glue stick or foam tape for dimension.
Now for the mini album inside. This is so fun and easy to make.
It's only one sheet of 12 x 12 paper! Tim does a wonderful job showing how to cut the paper and assemble the album, so instead of reinventing the wheel here, I ask that you simply watch his video at the link I gave you above.
One thing I did learn on my own is that if your paper has a distinct direction of the print like mine (not random) that when you make those first cuts, be sure to turn your paper a quarter turn to the right. This will make most of the images on the pages upright in the finished folded book. There are still a few pages where the images are upside down, but it didn't bother me.
Can you believe one sheet of paper made this cute little book? I made a few slight adjustments to mine that you'll see...
For example, when the book is first folded down, Tim used tissue tape to bind the spine and all the pages. I skipped the tissue tape, in fear that it wouldn't hold well enough, and also wanted more space for my photos and stamped images. Additionally, I altered the pocket location on the pages so that some are open at the top and some on the sides. Tim's are all on the sides, as you'll see in his video.
To make my alternating pockets, I used 1/4" ScorTape to seal the pages as needed. I did this before putting on my spine simply for easy access.
I opted to use Sticky-Back Canvas for my spine. I cut a piece 1" x 3" and first adhered half to the front cover, then for added strength I squeezed a thin layer of Super Thick Tacky Glue onto the canvas where the pages would touch, then wrapped the remainder of the canvas to the back cover.
Carefully, after laying the cover flat on the table, I stamped and embossed this compass image with black powder then heated it.
Then embellished with a Chit-Chat sticker and the clear bubble from Tim's File Tabs. In the upper right corner, I used some of Tim's new Label Letters to spell out DISCOVER. (see main photo above)
The inside pages each have a photo mat and stamping and a travel-type word. Journey is the first. The small Motorcyclette image is from one of Tim's newest sets called "Tiny Things" and I knew when I first saw it, I had to have it. It has 25 quirky little images. I used a lot of them in this mini book. See the pocket on the right with the tag peeking out?
This tag from the Tiny Tabs and Tag die is the perfect size for this mini book. It sticks out just a little bit, so it's easy to pull out and still fits in my tin nicely. This would be a good place to journal or write a nice message.
Next page. Explore. The pocket is at the top this time and since a tag doesn't allow my book to fit in my tin here, I made a simple square piece to slide inside, then created a pull-notch with a 3/4" circle punch.
A few stamped images and inking around the edges. Easy.
Next page. Wander. See the New Jersey license plate sticker? That means something special to me since I'll be going to Ranger University in New Jersey at the end of April. (!!!!) The pocket is on the right side again with a tag peeking out.
I stuck with Archival inks for all my stamping because I knew I would be journaling with a marker-style pen later and don't want anything to bleed.
Next page. Dream. What better to have stamped on this page than an elephant and a hot-air balloon. Two things I've never ridden, but dream to some day. The pocket is at the top again. See how I'm alternating?
Tea cup and violin plus some script in the background. Random, but fun to look at.
Next page. Enjoy. Love the binoculars and the bee. They make me happy, as you can see.
What better things to look at through your binoculars than birds and bees? I love these sweet birds on a branch.
Final page. Live. A good word to end with. No pocket here because the right-hand page is also the back cover.
And it fits perfectly in my tin.
Now it's your turn. Grab a sheet of your favorite 12 x 12 paper and watch Tim's video and make one of these fun little books today. It takes no time at all and you'll have a great time doing it.
Thanks for stopping by today. Have a creatively fantastic day!


this is very very cute! love the mini tins, will have to watch out for some of these but since i hjave no neighbors, going to be ahrd to fins. I love the way you did all the apges and using the score tape instead of the tissue tape which looks like it will really hold
ReplyDeletethanks for sharing
That's fantastic, Annette! I just love the cover with all the diecuts and the album itself just blew me away... so many super details!
ReplyDeleteThis is fabulous! I am a lover of mini albums...and this one does not disappoint!!
ReplyDeleteI love making books and this is A superb example ! So beautifully made and such a fabulous use of those mini stamps , I absolutely love this , great instructive post also x
ReplyDeleteWOW!!! This is going in my inspiration stash! This is gorgeous, really beautiful! Lots of love from Laura xxxxxxxxxx
ReplyDeleteI'm giddy over this project...it's darling! And that mini album...gasp...I'm going to make one right now! Love this!!
ReplyDeleteWow, what a fantastic project... the altered tin is lovely enough, but that tiny book is an absolute knockout - wow, I say again!!
ReplyDeleteAlison x
That is really cool. Wish my neighbor's smoked. LOL
ReplyDelete