Hello everyone! Welcome to my first post for the new Creative Carte Blanche. We're a community of artists and crafters who you might recognize from our previous group The Curiosity Crew from the Compendium of Curiosities III Challenges. Every month, this great group of women will open a new theme (what we're calling a "Creative Adventure"), encouraging you to create anything you like! Our goal is to inspire and encourage creative freedom and we'd love it if you could join us. Simply follow along, upload your project along with other artists to our new blog, and share your creative process.
February's Creative Adventure is "Trying something artistic you've never tried before." Earlier this week, Candy Colwell shared an amazing art journal spread where she tried drawing a face and hand for the first time into her journal. She shares her process here.
It's my turn today and I ventured into the world of mosaic art. Something I've definitely never tried before. I discovered this new Distress Paper Mosaic Kit from Ranger and knew it was something I just had to try.

I created this functional shabby chic boudoir caddy that would be perfect for holding feminine things like pretty perfume bottles, make-up, powders and other such lady things. I'd love to share how it was made, and what I learned with this mosaic kit, so you might try one too.

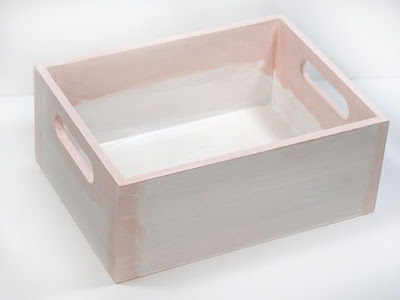
It all started with this simple wooden box from the craft store. It measures a generous 6" x 8".

Paint the box with two coats of white gesso, drying in between each coat. Paint light pink paint on edges that might show after mosaic is done and papers are adhered inside. I've used Tattered Rose Distress Paint.

Adhere pretty papers to the inside walls and base of the box. I used Prima's new Tales of You & Me in the 8" x 8" collection.

In the Distress Paper Mosaic Kit, you'll find three products. First, you'll spread the "grout." Do this evenly with a palette knife if you have one. I wouldn't recommend a paintbrush because it doesn't come out smooth enough. If you don't have a palette knife, you could always use a popsicle stick or an old credit card or gift card. This step takes quite a while to dry, and you don't want to rush it. It needs to dry completely. Mine wasn't very thick and it took a little over an hour.

While the grout is drying it's the perfect time to cut paper pieces. I decided to create a square border across the top of my box, so I chose a neutral paper in the collection for these squares. The second product in the mosaic kit is the glue. Once the grout is completely dry, glue each piece of paper down, leaving space in between so you can see the texture of the grout.

Continue cutting papers in random pieces. You can certainly cut them uniformly if you desire, but I was after more of a broken china look for my project. Just keep gluing and gluing. Once you get all your paper pieces down, seal over everything with more of the glue.

If you like, you can add ornate metal feet to the box. I painted mine with two coats of white gesso, then two coats of Tattered Rose Distress Paint.

I went over all the pieces with Victorian Velvet Distress Paint only on the raised areas to give more color and dimension. Then I grabbed more items to add to my box, like this heart locket and some resin flowers. Once all the paint was dry, I sealed each piece with glossy Mod Podge.

As you can see, you can work more items in between the paper pieces like the bird and the leaves. I added all the metal pieces at this stage before the final step in the mosaic kit process.

The last product in the kit is the "Glaze." It's either the same exact thing or very similar to Glossy Accents. Carefully outline each paper piece with the "glaze" then flood inside those lines with more. This is when it really begins to look like little pieces of china.

My photos just don't do it justice.

I wish you could see it in person.

It really is quite pretty, trust me.
I'm so glad I chose this as my "try something never tried before" project. It turned out even better than I had imagined.
Here are few notes I wanted to share with you about doing this mosaic kit:
A project of this size took about a full day to complete. There is much drying time needed in between steps and you really can't rush it. Don't fuss too much over the randomly cut pieces of paper or you'll be at it forever. I tweaked a few cuts here and there to fit certain spaces, but most of the time just let things happen. It's one of those projects that takes a good amount of time and patience, but turns out so beautifully in the end, you'll be glad you did it!
Enjoy the process, and let me know if you try it.
Thanks for stopping in today. Have a great weekend!
I wish I could see this in person, too, Annette!! It's gorgeous!! Big Congrats to you for being a part of the new Creative Carte Blanche team!! This is the first chance I've had to come over, and I just had to say YAY to You!! :) :) XOXO-Shari
ReplyDeleteAnnette...this mosaic box is a true work of art! I love it! Thanks for sharing this beautiful piece and your great tutorial!
ReplyDeleteI am inspired. Impressed, AND inspired. I love your paper mosaic crate...it's gorgeous! I can't wait to try my hand at it! Thank you!
ReplyDeleteWOW! Annette, this is fantastic! I love a project that's both gorgeous and practical, and you've nailed it. The mosaic is absolutely perfect. You GO, girl!
ReplyDeleteI enjoyed your post about this new product--the caddy turned out great. The papers you used are very pretty and compliment the tiny roses and other embellishments. How clever to think of using feet! Thanks for the tips, too.
ReplyDeleteYou had a lot of work with this box but it was worth it!!! Your shabby chic box is amazingly beautiful!!! It's so delicate, so feminine! I love the colours too!
ReplyDeleteThis is gorgeous Annette....such a novel way of using the mosaic kit. Shabby chic perfection xx
ReplyDeleteJust Gorgeous ! Well Done
ReplyDeleteElaine H X
What a beautiful project, Annette! Love how it turned out!
ReplyDeleteOh I wish I could see this in person, if it looks even better than your photos it must be truly incredible because it looks pretty amazing to me!! I did not think I needed to buy this kit but having seen your creation, it has just gone on my wishlist! Anne xx
ReplyDeleteThis is so pretty, Annette! I'd seen the kit, but not anything done up with it. I love the tile look achieved with the glaze. Your finish out is perfect, of course. I love the gesso on the foundation feet. I've never painted those, love it!!
ReplyDeleteThat is so pretty Annette, love the papers you chose to line your caddy and for your mosaic pieces and love how you added the fussy cut birds and leaves, perfect! I didn't think that I needed the mosaic kit when I first saw it released but now after seeing your beautiful boudoir caddy I am rethinking that decision! Thanks so much for sharing it, Deb xo
ReplyDelete