
Hello again crafty friends. I'm sharing another Valentine tutorial today and it's this sweet little heart-shaped box which measures about 5" x 5 1/2". The supply list for all three Valentine projects I'm sharing this week can be found here. Just scroll to the bottom of that post and it's all there for you. Now let's get started on today's project.

I have provided a few templates for you, since the Sizzix die I used is very old and no longer available. Here's what you'll need to cut as shown in the photo above:
Two hearts, both cut from Graphic 45's 12" x 12" Children's Hour February Montage sheet. One showing the front side of the paper and the other showing the back. (heart template below)
The Sweetheart cut-apart from the February Collective paper.
Six 1" x 12" strips from the February Montage sheet. You'll use two from the front of the paper and four from the back.

From the Heart Box Template, cut two hearts and four of the side walls. Flip two of the wall strips the opposing direction. You can use thin cardboard, heavy-weight poster board, or Bristol like I did. These pieces will serve as the box structure to which you'll adhere papers.

Score along the 1" length of each wall strip and fold in the tabs as shown along your score line. Condition the paper with the handle of a smooth pencil or dowel to get a slight curve on the side walls. You should have two sets like in the photo.

Place adhesive on the tabs of each of the four strips. (I used 3/8" Scor-tape) Working with one wall strip at a time for the box's lid, carefully peel and stick each tab along the right edge of one of the cardboard hearts, curving as you go, matching up the outer edges evenly. Continue with other wall strip along the left side of the heart (see next two photos).
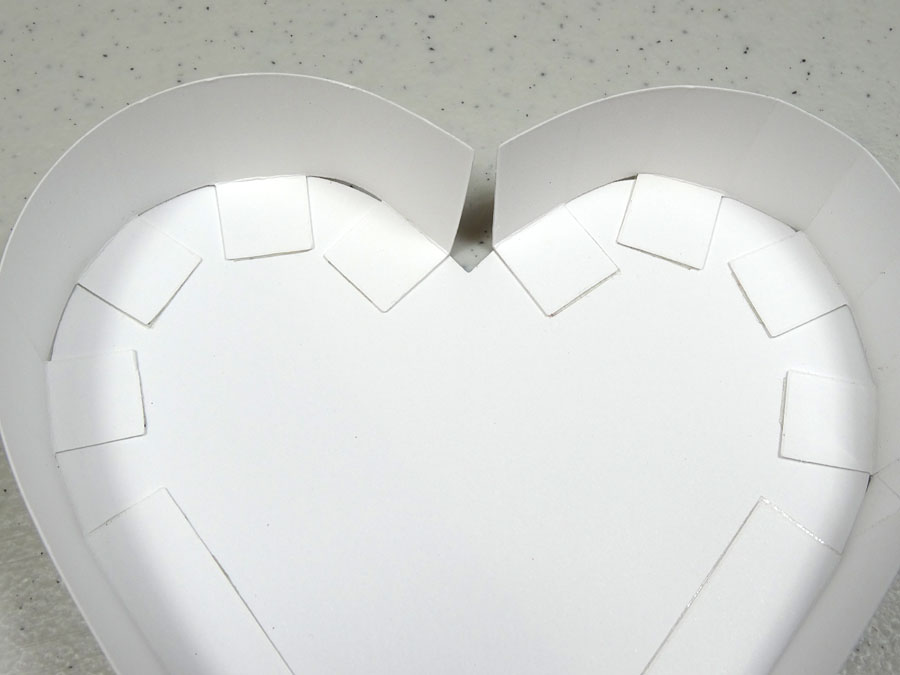
When you finish, there will be a gap at the top of the heart like this. No problem.

View of the wall strip lining up evenly with the heart piece.

Repeat the same steps for the heart box's bottom portion, except this time you'll adhere the wall strips about 1/16" inward from the heart's edge, as shown here. This allows the heart box lid to fit over the heart box bottom.

When you're done, the gap should be minimal like this. At this point, you can add a piece of clear tape to reinforce this area. All of it will get covered with paper, so you won't see it later.

Check the fit by putting the lid onto the bottom box. Make any necessary adjustments at this point.

Use my Heart Base Template to cut one large heart from thick chipboard. This will serve as the base for your heart box and as a gripping point so you can easily lift the lid off your heart box. Trace the chipboard heart onto vintage pink card stock. (I used Tim's Kraft Core by Core'dinations). Cut out the pink and adhere it to the chipboard. If you have something similar, die-cut a fancy heart doily from Ivory card stock. I used Stampin' Up's new "Bloomin' Heart" Thinlits die. My friend Grace sells Stampin' Up. Here's her link.

Once you've adhered the pink card stock to the chipboard base, sand it gently for a smooth and finished look. Then dab some pink paint along the sides. This covers the chipboard core nicely. I used Victorian Velvet Distress Paint.

Adhere the strips of paper to the inside walls of the box bottom. (You will only need a small portion of the second strip to finish.) Trim the paper heart about 1/16" all the way around and test it to fit into the box. Adjust as necessary, then adhere. Adhere the red paper strips to the outer walls of the box, trimming excess as necessary. Use a thick tacky glue to adhere the box bottom to the pink/chipboard heart base. Set aside to dry.

Adhere the red paper heart to the box lid. Add the lacy heart die-cut. Adhere the remaining two red paper strips to the outer walls of the box, trimming excess as necessary.

Adhere pretty trim around the perimeter of the box lid. (I used this red pom-pom trim from May Arts). Tie a pretty bow with coordinating ribbon and adhere to the top of the lid. Adhere some pretty flowers to the center, then add a wavy look to the Sweetheart cut-apart with a smooth pencil or dowel and adhere it below the flowers. Add a pink sparkly heart.

Here's a closer look at the wavy cut-apart and the pink sparkly heart. The heart gem is actually a button from Hobby Lobby. I simply heated the back side with my embossing gun for a few seconds and removed the button shank from the back so I could glue it down flat.

Keeping the lid separate from the box, adhere beaded trim around the perimeter of the base of the lid as shown. It's helpful to work on a non-stick craft sheet so any residual glue doesn't adhere to anything below the trim. Let this dry fully before moving it.
You've finished the heart box! Now all you have left to do is put some yummy sweets or a nice little gift inside. Slide the lid onto the box and you're ready for Valentine's Day!

Join me again tomorrow as I share how to make the sweet Valentine gift bag. You'll want to make a bunch of these, they are so easy and fun!
And don't forget, as my thanks to you for following along, I have a GREAT give-away planned for one lucky winner. All you have to do is leave a comment on each day of my three Valentine tutorials. I'll pool those names together and draw one winner who will receive a wonderful mixture of Graphic 45 goodness! I'll post the winner this Saturday right here on my blog and on my social media sites. Good luck!!
this is adding up into a gorgeous gift set. Thank you for such clear and detailed instructions
ReplyDeleteJane
Such a gorgeous box Annette x
ReplyDeleteThanks so much for coming up with an "old school" approach to replicating a retired die! I almost think I could tackle this one!
ReplyDeleteYour box is just Gorgeous and will be so useful, beautiful papers and colors used, thank you for sharing your Tutorial .)
ReplyDeleteOh my goodness just absolutely love this. Want to make this for my mom so I need to get this paper. Thanks for another terrific tutorial.
ReplyDeleteOh my goodness just absolutely love this. Want to make this for my mom so I need to get this paper. Thanks for another terrific tutorial.
ReplyDeleteI love the dimensions of the box! It is gorgeous!
ReplyDeleteLove learning new skills!!!!
ReplyDeleteLovely box! Thank you so much do including the templates.
ReplyDeleteOh my, what a great treat box to go with the card! Thanks for including templates.
ReplyDeleteThis is gorgeous and I am so thrilled I found it. I have this die and have been pulling my hair out trying to get it to work. I love how you covered it and I shall give it another try.
ReplyDeleteThe box is such a lovely idea to be used for other events beside Valentine's Day! Once again, the directions, and the templates help make it an easy to follow plan. Thank you
ReplyDeleteThis comment has been removed by a blog administrator.
ReplyDeleteWhat a great tutorial! I must make one just for the fun of it. Yours is so lovely and the paper's divine.
ReplyDelete