
The video is on hold until I get my new Mac next week, so for now I am supplying the cutting guides and directions on my blog as still shots. Many of you were wanting to make this as a Mother's Day gift, so I thought we'd better get to it so you'd have time to add photos and journaling for Mom.
Supplies you'll need to make this album:
• X7119B Veranda Level 2 paper pack (You'll use only one quarter of the pack)
• X7119C Veranda Level 2 Stickease
• Z1098 Love Letters Rub-ons
• Z1131 Creme Brulee Ribbon Rounds Collection
• Chipboard Book • Cutting Mat • Craft Knife • Adhesive • Scissors • Foam Tape • Sanding block • Chocolate ink and a sponge or finger dauber • Chocolate marker
 The album itself was a Mary Engelbreit chipboard book from Michael's for one dollar, but if you can't find one anymore here's a template you can import into any program on your computer and enlarge it to 6 x 6, cut it out and trace it onto thin cardboard to make as many pages as you like! The Veranda mini album has 5 physical pages to it.
 I like to start with little Post-its of each page. This will help you keep the paper pieces organized as you cut them. Since there are 5 physical pages, there will be 10 total pages to cover. My post-its say: FC (for front cover), 1, 2, 3, 4, 5, 6, 7, 8 and BC (back cover).
For the next several photos, the cutting directions are provided right in the photo. It's really easy! As you cut, make your piles under your Post-its. Here we go...


Now that all the cutting is done, you are ready to start assembling. Here are close-ups of each page with tips and directions below each photo. If you can't see a detail clearly enough, simply click on it and you'll get an enlarged view. I have used Chocolate ink for all ink distressing unless otherwise mentioned. Have fun!
 FRONT COVER: Cut a piece of the Creme Brulee 1/4 inch grosgrain ribbon about 7 inches long. Lay it on a scrap sheet of paper and ink the ribbon with Chocolate ink on a finger dauber. You can leave the ribbon alone if you prefer. I just liked the muted look with the Chocolate. Put it aside to dry. Assemble the album cover as shown in this photo utilizing the Stickease, foam tape, sanding rough edges and ink distressing. I recommend applying the rub-ons before you stick down the label sticker. As a final touch, I used the brush tip of a Chocolate marker to create shadows behind the stem sticker so that it stood out a little better from the background paper.
 PAGE 1: Did you remember to punch through the hole for the ring on the front cover? Do that now, before you start page 1. This page is really easy and requires little direction. Just remember to do the rub-on first on that piece of yellow paper. It's harder to do after you have it down since the front cover is so bumpy with embellishments. TIP: Cut the rub-on to the length you want it FIRST before rubbing it down. Use non-sticky scissors if you have them.
 PAGE 2: Another easy page. See how I used a circle punch to clip away the corners on the Juniper photo mat? Those brads are actually stickers from the Stickease set. On this page, you're going to apply the rub-on AFTER the paper and ribbon is adhered to the page. Fold over the ribbon to the back side. It'll get covered up when you get to page 3. Don't forget to use your foam tape to pop up elements, but BEWARE, do not pop up elements on both of the facing pages. Choose one of the two. This will avoid any problems with the book opening, sticking, etc. I didn't know this was going to happen and I popped up stuff on both sides, and my book sticks together terribly!
 PAGE 3: You might have discovered by now that it's helpful to use a cutting knife and mat to trim up any paper or stickers that hang off the edges. On this page I used a piece of a border sticker and added it a piece of Cocoa cardstock (that I failed to include in the cutting directions, sorry! You might be able to salvage that piece from your scraps.) The Cocoa piece is about 5/8 x 4 1/2 inches long. Then I added some ribbon and tied it in a bow. Obviously this has to be done before you stick it all down. The LOVE rub-on was easy to apply after the whole page was assembled.
 PAGE 4: It's becoming pretty clear what to do on these pages, right? Just keep in mind on this page that if you are going to adhere the corner stickers, you'll want to be mindful that you'll need to slip a photo underneath. What I like to do is peel off the sticker's backing, cut the backing so where I don't want the sticker to stick and reapply it to the back of the sticker until I'm ready to put down my photo. Then I peel and stick that edge back down.
 PAGE 5: Again, I used portions of one sticker border for the photo mat of this page. I popped up the circle with the sticker on it, but again didn't stick it completely down so that I can slip my photo under it a little.
 PAGE 6: This page has another of those border stickers which has been cut in half, so that I have two six-inch long stickers to fit across the album. Although I used large Chocolate eyelets for the holes for my ribbon at the top, you can simply punch large holes with a Crop-a-dile tool. I feel like I wasted those eyelets since I can't see them very well behind the ribbon.
 PAGE 7: This page has a lot of vertical action going on. Use nice sharp scissors to cut the ribbon, or you can cut your ribbon a little long and fold it under on itself for a cleaner look. To keep ribbon from fraying, I use a product called Fray Check that I purchase in the sewing department of WalMart.
 PAGE 8: We're almost done! I cut the large headline sticker so that it just reads "Enjoy Life". I added some leftover swirly rub-ons here and there, and I cut a label sticker and added just the ends to the right and left of the "Enjoy Life" sticker. The ribbons on this page can be folded over to the back cover since you're going to cover them up later.
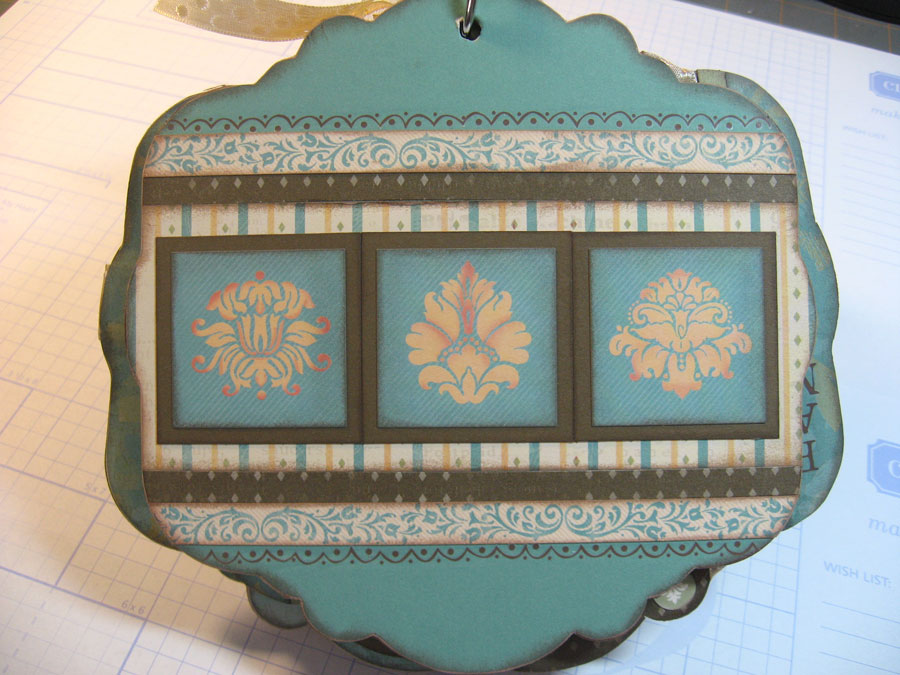 BACK COVER: Layers of paper, border stickers and those botanical square stickers pull this page together. Before I butted those Cocoa cardstock squares, I inked all the edges with Chocolate ink. When they butt together, they look nicer than if you had cut one long piece of cardstock, don't you think?
 FINAL TOUCHES: Now you can have fun with all that leftover pretty ribbon and tie pieces to the ring for a pretty, feminine touch. Make sure to cut the ribbon ends on an angle and touch them with a little Fray Check so they don't fray over time and handling.This was a long one! If you have any questions or are confused by anything, please don't hesitate to contact me via e-mail. I would love to hear how your album creating went, so please come back and make a comment!
that is so so pretty! i love it! i wonder if you could get a template to cut on the cricut to do chip cover & pages...hmmm....
ReplyDeleteThanks so much for posting the instuctions! I was able to find the mini albums at Michaels for 25 cents. I snatched up 11 to make albums for my girls in scouts.
ReplyDeleteWhere have I been? You're getting a new computer? Yeehaw!!!! Please bring your awesome album Sunday, doll!
ReplyDeleteAWESOME instructions! Thanks so much for sharing!
ReplyDeleteWhat a fun class! My first class ever, hope to attend many more. You make my work look great! Love my mini album. Thank you.
ReplyDeleteThis album is absolutely GORGEOUS!!!
ReplyDeleteThank you so much for posting direction and showing each page.
You are a great artist and I can't wait to see your album at convention. I wasn't able to make one myself.
Gorgeous. Thank you so much for the fabulous Ideas and the free template xo
ReplyDelete